Question: The caulking around our shower has black mold that we can no longer remove. What can we do to eliminate this mold?
Answer: Mold, mildew, and soap scum accumulate in the shower over time and need to be addressed. These can be removed with Tilex or a similar product until it gets behind the caulk. When that happens, the best solution is to remove the old caulk, clean all the mold and mildew, and recaulk the seams. Another Woodchuck told me that Wet and Forget has instructions on their latest product to clean mold in a shower.
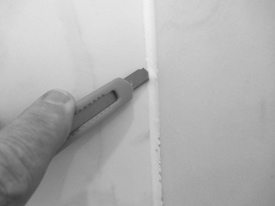
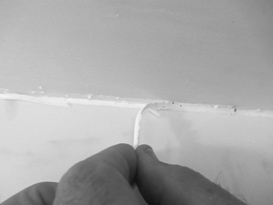
The caulk can be removed by cutting it loose with a flat utility knife. Press the knife flat against the wall and slide it behind the caulk. Cut it away from one wall and then cut the caulk away from the perpendicular wall. This will take some time. If you finish in less than an hour you did not remove enough of the old caulk. If there is a thin film of caulk where the knife did not cut it completely away from the wall you can use a plastic putty knife to scrape toward the joint to remove this film.

Fig 1. Cut out the old caulk with a utility knife.
When you have removed as much of the old caulk as you can you need to clean and dry the surface before applying the new caulk. Spray the joints with Tilex or a similar product to remove and kill all remnants of the mold and mildew. Scrub the joints with as sponge and rinse well. Dry with a towel. Blow dry with a hair drier to get all the moisture out of the joints.
The proper material to caulk the shower joints is silicone with mold and mildew protection. I have had good luck with General Electric silicon II KB supreme. It claims 10-year mold-free product protection. It comes in a 9.8-ounce caulking tube. You will need a caulk gun to apply the caulk. You should cut the nozzle at a 45-degree angle where the nozzle diameter is ¼″. This will give you a bead 1/8″ to 3/16″ in diameter. If you haven’t done this before you may want to practice on some scrap wood. Just nail two boards together at a 90-degree angle. Practice putting an even bead of chalk along the inside corner of these practice boards.

Fig 2. Peel the old caulk away after you have trimmed it from the wall on both sides.
When you are ready, place the nozzle at a 45-degree angle to the joint and pull the trigger. When the caulk starts coming out, draw the gun along at a steady pace to lay down an even bead. Keep clicking the trigger as you move along. When you have finished one joint you can place your finger lightly on the caulk and draw it along the joint to smooth out any lumps or wiggles. The GE silicone caulk does not stick to your finger with light pressure.
The instructions say it is “shower ready” in one hour, but the full cure is 24 hours. I would not get the caulk wet until it is fully cured in 24 hours.
This job is not difficult, but it will take you two to three hours to do it properly. If you follow these instructions, you will have a good-looking caulk job that will last many years.
Question: The light for our house numbers isn’t working. We have changed the bulb, but that didn’t do the trick. Our handyman spent quite a bit of time on it, but he can’t get it to work, either. Any suggestions?
Answer: If both bulbs are good you will need to trace back to see if power is getting to the bulbs. Remove the 2 screws holding the numbers assembly to the house and check to make sure the wires are making good contact with the light sockets. Wiggle the wires and see if the lights flicker off and on. If they do, repair the connection to the socket.
If that was not the problem, use a multimeter to check for voltage. If you don’t know how to do this, you will need to get an electrician. If there is no voltage, it is probably the transformer that drops the voltage to the bulbs. These transformers can be found almost anywhere. Start looking in the utility room as that is where most of them are located. Some are in the attic and some are mounted in a corner of the garage. With the multimeter, check the output side of the transformer. If that is ok the only thing left is to check the input voltage. Be careful as this is 120v so don’t touch it. If this wire is dead your only choice is to run a new line. I assume you will hire an electrician to do this.
If you have suggestions for future tips or have questions about maintenance around your home submit them to ask.the.woodchucks@gmail.com.


